Feature
White Paper
Why Enterprise AI Fails at Scale

AI agents are moving quickly from experimentation into real operational use. Instead of single prompts, teams are now stitching together reasoning, tools, APIs and approvals into multi-step workflows. As this shift happens, a common problem emerges: agent frameworks handle intelligence, but not orchestration, visibility or control.
That is where platforms like n8n come into play.
n8n provides a practical way to connect AI agents to real systems while keeping humans in the loop and behavior observable. This tutorial bridges the gap between agent concepts and working, inspectable workflows that can be run, monitored and trusted in real environments.
An AI agent workflow differs from a single LLM call. A prompt-response interaction yields an answer, but an agent workflow produces a sequence of decisions and actions. The agent may call APIs, evaluate responses, adjust plans, ask for clarification or pause before continuing. Once that behavior spans multiple steps, time, and systems, AI orchestration is necessary.
Orchestration provides structure around decision-making, tool use, human intervention and logging. It makes behavior observable and controllable, enabling AI agents to move from demos to workflows teams can monitor, refine and safely run in real environments.
n8n’s free tier offers two options: a hosted web interface and a local install.
The hosted option is fastest for beginners since it requires no setup. You can sign in, open the workflow editor and start building immediately. It's well-suited for learning, prototyping and small-scale agent workflows where speed and convenience outweigh deep control.
Local installation gives you full control over execution limits, logging depth and long-running processes, which is ideal for complex or sensitive workflows with tighter governance requirements. The tradeoff is that it requires more operational overhead.
Local n8n installs provide more control over execution limits, data handling and complex workflows beyond the hosted tier’s limits. There are two main methods to install n8n locally:
n8n provides clear, up-to-date guides covering installation steps, persistence and basic configuration.
For new users or those just exploring agent workflows, it's perfectly reasonable to skip local installation for now and continue using the hosted interface. You can always move workflows locally later once you better understand your requirements.
For this tutorial, the hosted free tier is the primary path, with local installation treated as a next step once you understand how agent workflows behave and the level of control you need.
Related Article: ChatGPT, Gemini or Grok? We Tested All 3 — Here’s What You Should Know
From this point forward, everything happens inside the n8n web interface using the free tier. We will build incrementally, validating each step before moving on.

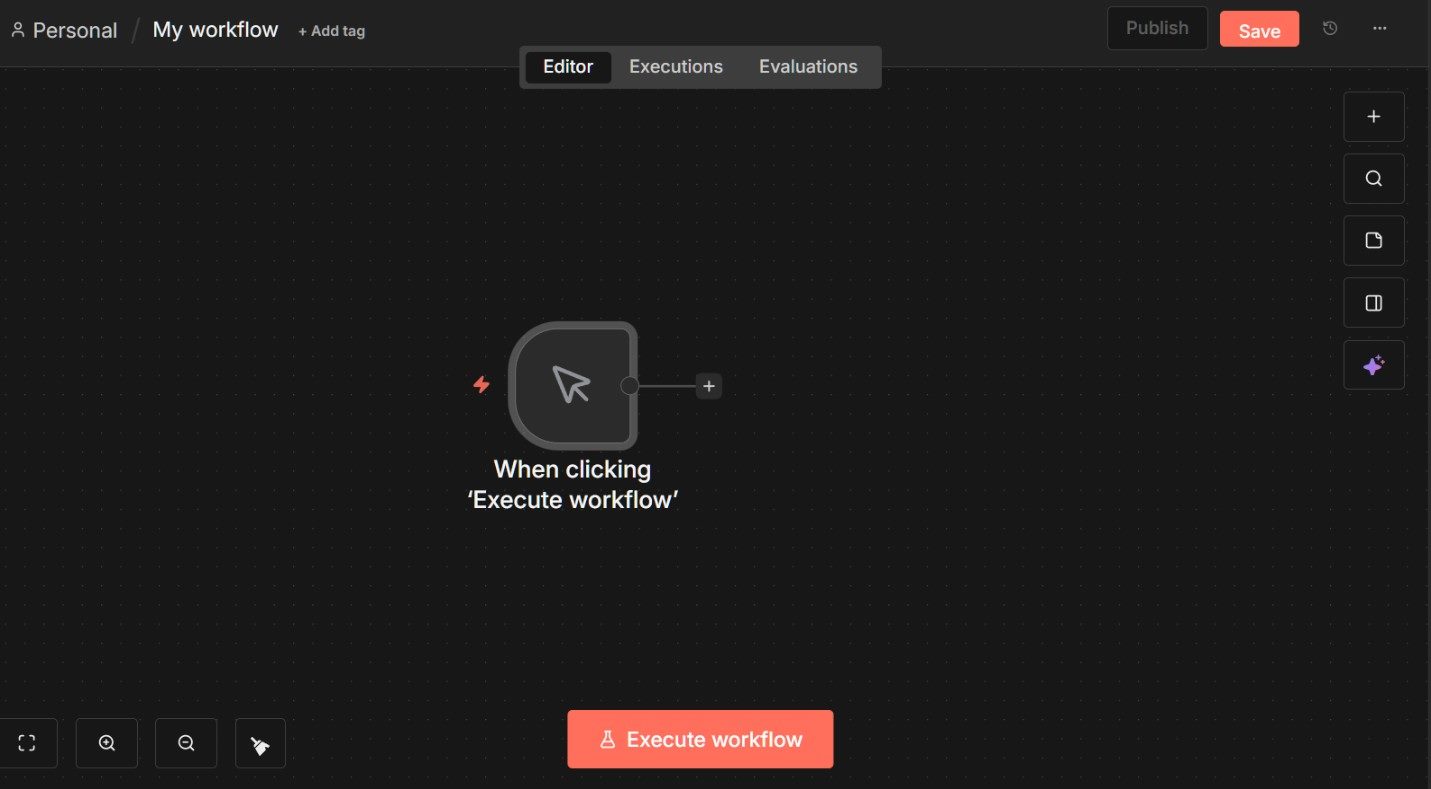
Log in to the hosted version of n8n and create a new workflow.
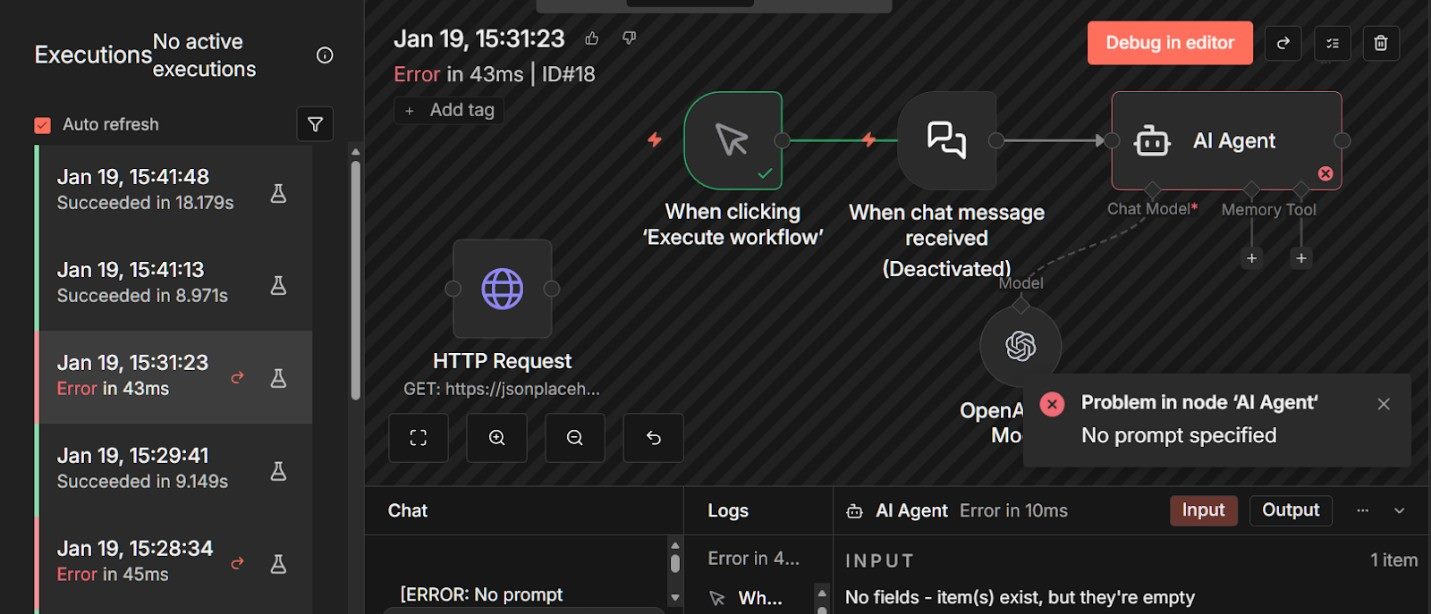
With a new workflow open in n8n Cloud, the first node you will see is a trigger labeled “When clicking ‘Execute workflow’.” This is n8n’s manual trigger. It allows you to run the workflow on demand while building and testing, which keeps early iterations simple and predictable.
Next, add an AI Agent node by clicking the plus (+) icon to the right of the trigger and selecting AI Agent from the node picker. This node will become the core of the workflow.
Unlike a basic language model prompt, the AI Agent node is designed to reason across steps and, later on, decide when to use tools or pause for approval.
At this stage, we are not yet building a conversational agent. We are validating that the AI Agent node executes correctly in a controlled, non-interactive way before introducing chat-driven behavior.
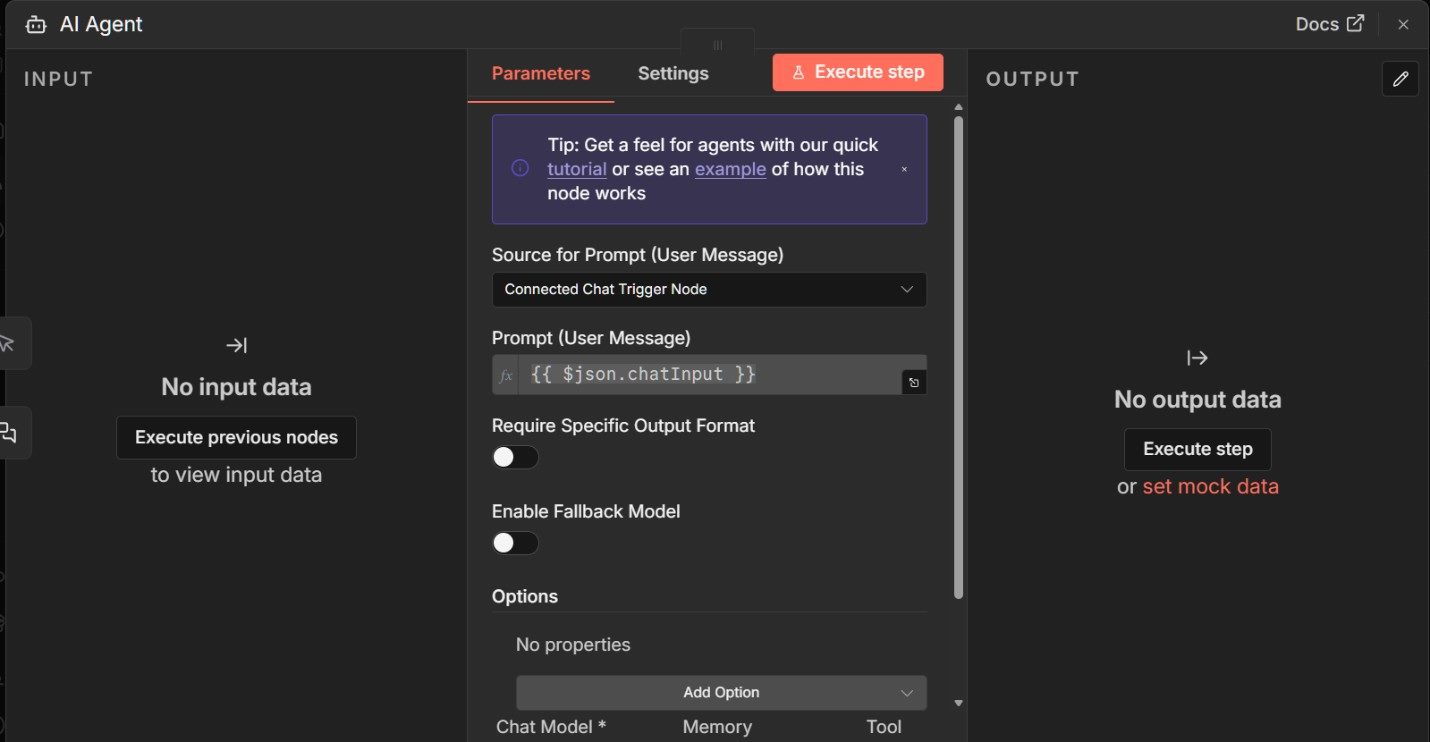
When you open the AI Agent node, the first thing to adjust is how it receives input.
By default, the agent expects conversational input from a chat trigger, which is not what we want for a manually executed workflow. If this setting is left unchanged, the agent will wait indefinitely for chat input and appear to “do nothing” when executed manually.
In the Source for Prompt (User Message) setting, switch the source from the connected chat trigger to a locally defined prompt.
This change allows the agent to run directly from the manual trigger without waiting for user input.
Once the prompt source is set locally, enter a simple instruction in the Prompt (User Message) field.
Keep this initial instruction narrow and explicit. For example, you might ask the agent to analyze a request and return a short, clear explanation in plain language, such as:
“Analyze the request and return a short, clear explanation of the main idea in plain language.”
The goal at this stage is not sophistication, but validation that the agent runs, produces output and exposes its behavior in the execution panel.
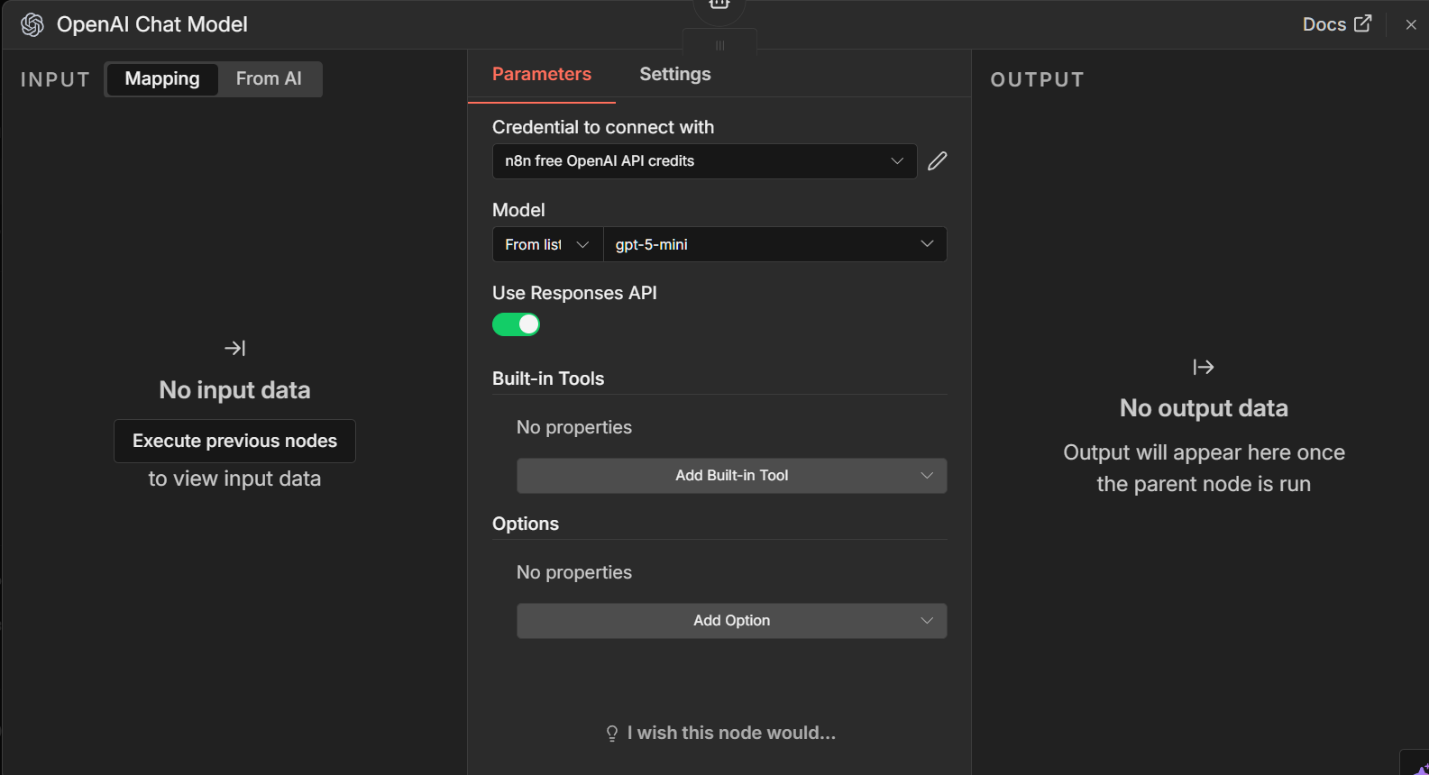
Next, select a chat model.
If a default model is already configured in your environment, you can leave it as-is. Otherwise, choose an available OpenAI-compatible model and accept the default settings. Model choice is not critical for this first run.
With the trigger, agent, and model in place, click Execute workflow.
The manual trigger fires, the AI Agent node runs and the output appears in the execution panel.
Double-clicking on the AI Agent icon after execution lets you inspect the response and metadata associated with the run, including inputs, outputs and any intermediate metadata generated during the run.
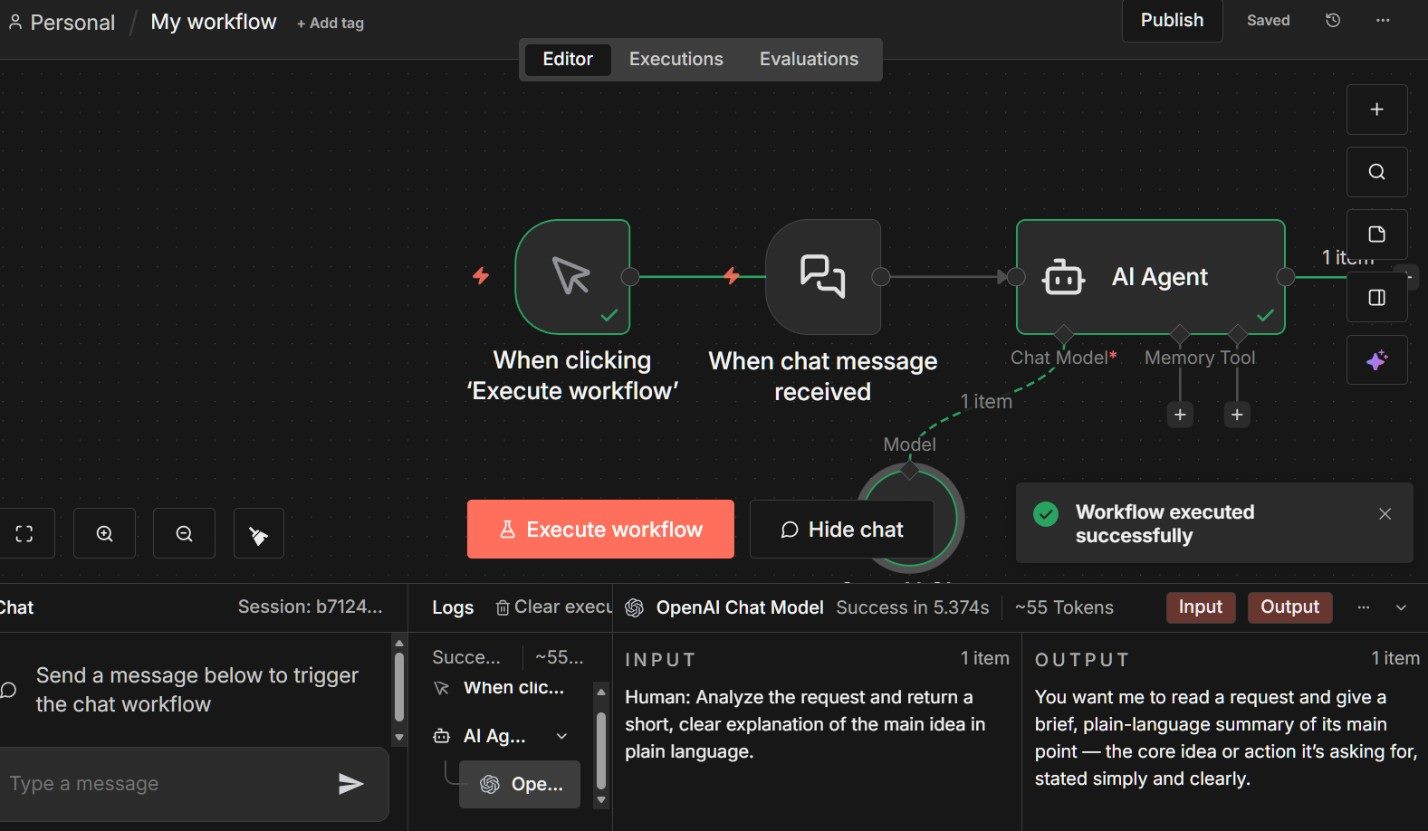
At this point, you have a fully functioning AI agent workflow.
It may only perform a single task, but it already demonstrates the key properties that matter going forward: explicit execution, visible behavior and a structure that can be extended safely.
All subsequent steps in this tutorial build on this same workflow rather than starting over.
Related Article: 5 Lessons From OpenAI’s Internal Data Agent Deployment
At this point, the agent can reason and respond, but cannot take action or retrieve external information. That capability comes from tools.
In n8n, tools are nodes that the agent is allowed to call when it determines additional data or action is required. A good starting point is the HTTP Request node, which allows the agent to interact with external APIs.
Start by adding a new node to the workflow, but do not connect it directly to the trigger.
Click the plus (+) icon on the canvas, search for HTTP Request and add the node.
Leaving the node unconnected is intentional. Connected nodes always execute as part of the workflow path, while tools remain dormant until the agent explicitly decides to invoke them. This distinction allows the agent to choose when external data is required rather than calling an API on every run.
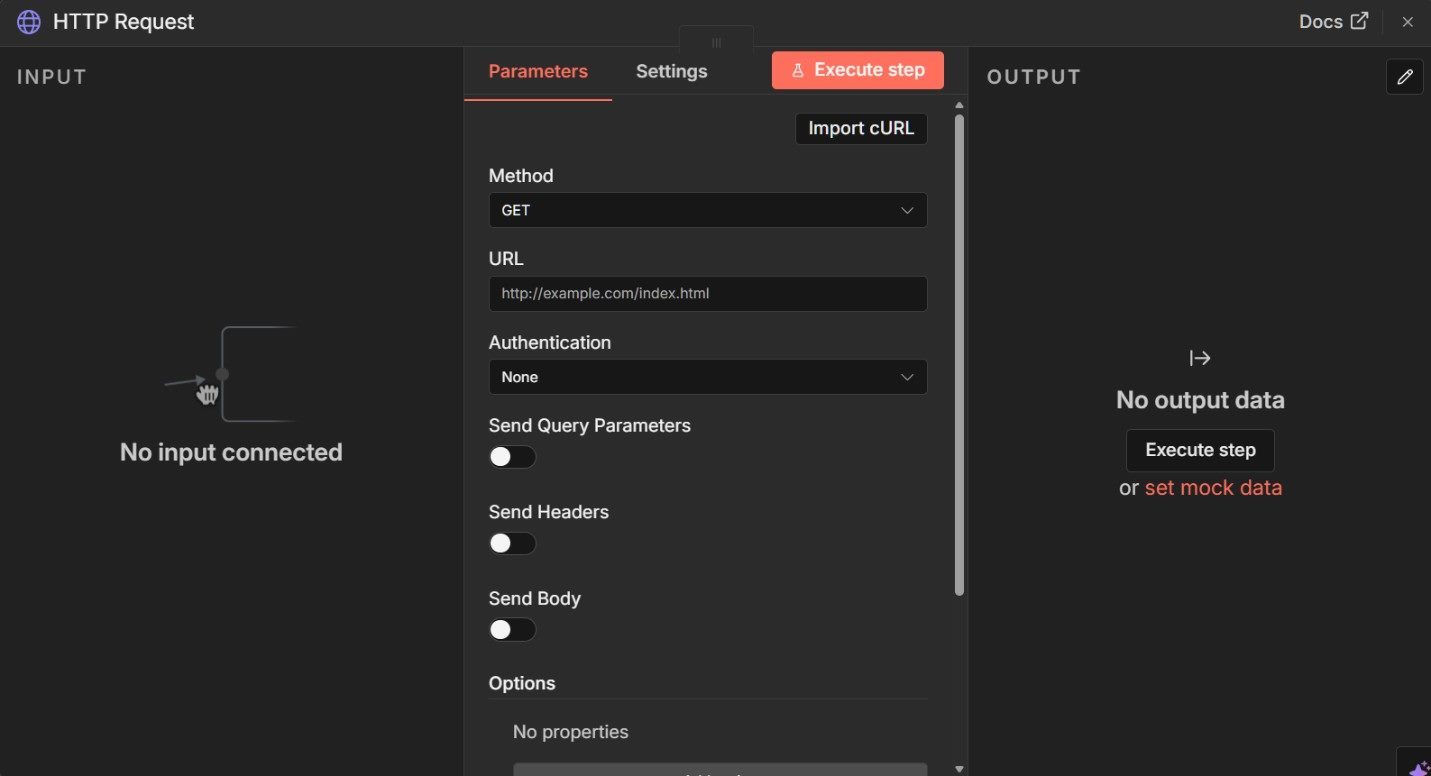
Open the HTTP Request node by double-clicking on it and configure a simple, read-only API call.
For learning purposes, a public endpoint that does not require authentication works best. One example is the JSONPlaceholder API, which returns structured placeholder data:
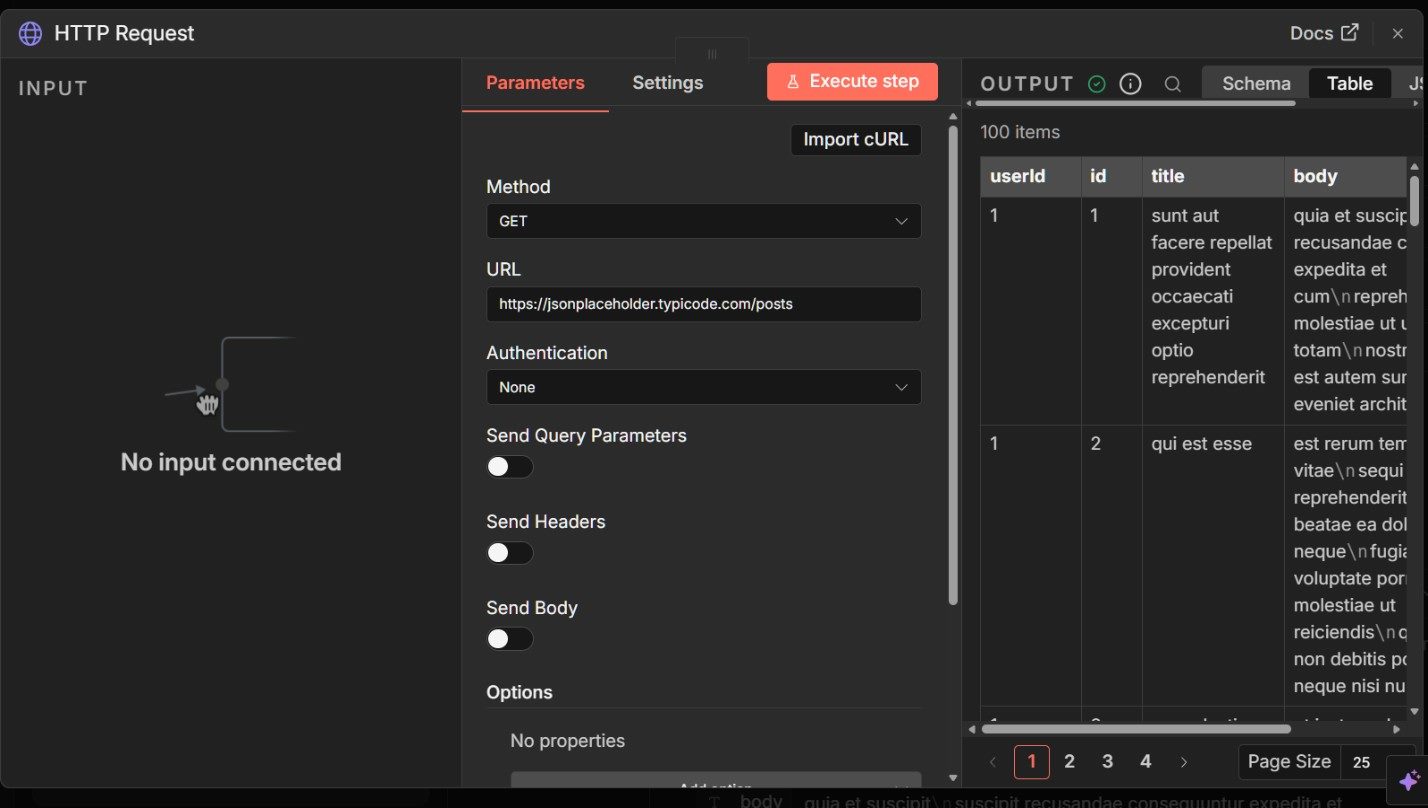
Set the method to GET and paste the endpoint URL into the request field. Leave headers and authentication empty.
Before moving on, execute the HTTP Request node by itself and confirm that it returns a valid JSON response. Once it does, save the node.
Next, return to the AI Agent node. Scroll down to the Tool section and click Add Tool. From the list of available nodes, select the HTTP Request node you just created.
This step is essential. You are explicitly telling the agent that this capability exists and it is allowed to use it when needed.
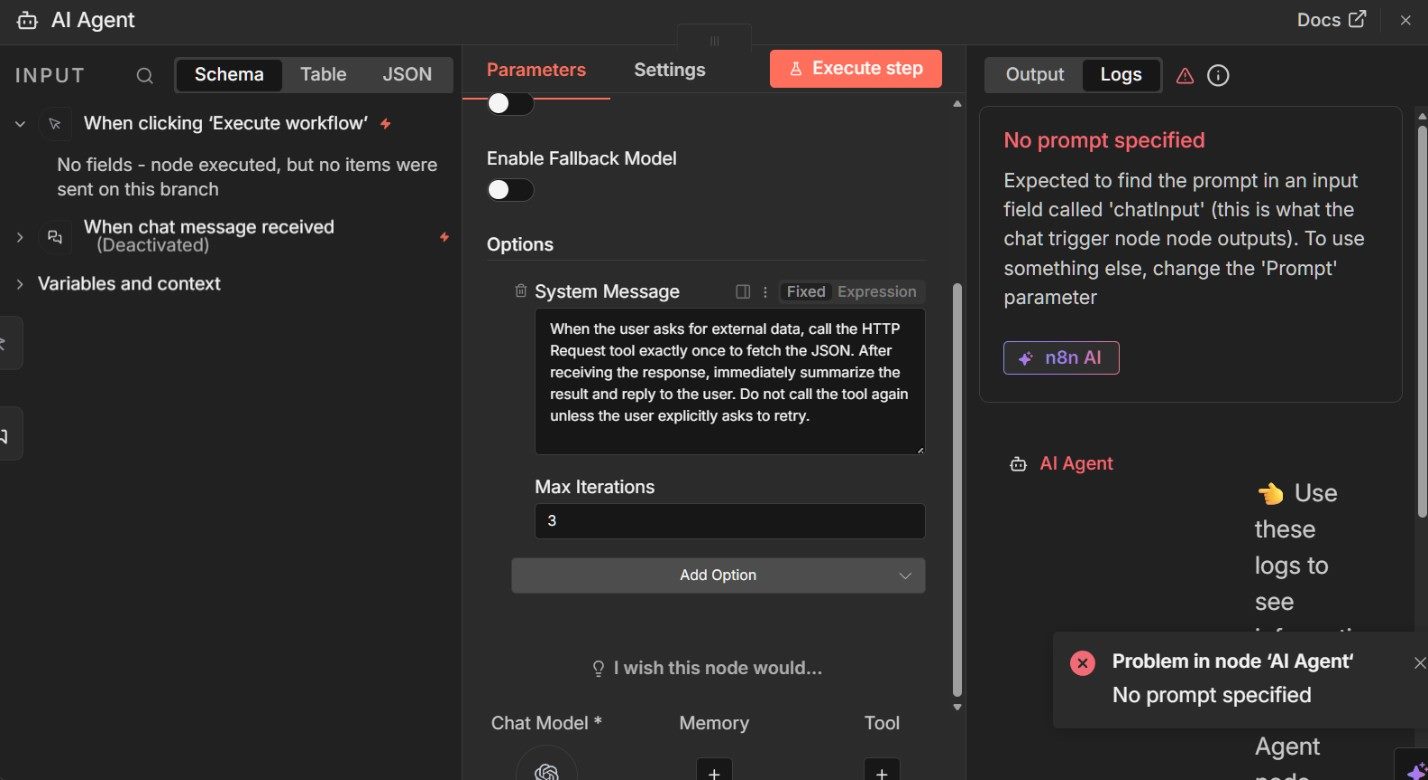
With the tool attached, update the agent’s instructions so it knows when the tool should be used. Before attaching tools, the agent’s system message might look something like this:
“You are an AI assistant designed to analyze user requests and respond clearly and concisely. If the request can be answered using existing context, respond directly in plain language.”
Once the HTTP Request tool is attached, extend that same system message with an explicit rule for tool usage:
“When the user asks for external data, call the HTTP Request tool exactly once to call the JSON. After retrieving the response, immediately summarize the result and reply to the user. Do not call the tool again unless the request explicitly asks to retry.”
This kind of instruction does two important things:
You can keep this instruction intentionally simple at first. As workflows become more complex, additional rules can be added to clarify priorities, restrict tool usage further or require human approval before certain actions are taken.
Now it is time to test the setup, but do not click the Execute workflow button. At this stage, the agent is designed to be driven by chat input, not by a manual execution step.
Instead, open the chat panel by double-clicking the chat icon (speech bubble) in the middle of the workflow and interact with the agent directly. This mirrors how the agent will behave in real use and ensures the “When chat message received” trigger supplies the input the agent expects.
For example, enter a prompt such as:
“Summarize the data returned by the external API.”
When the message is sent, the AI agent receives the chat input, determines that external information is required and then calls the HTTP Request tool. If everything is configured correctly, the HTTP Request node executes once, retrieves the JSON response from the endpoint and the agent uses that data to generate its reply.
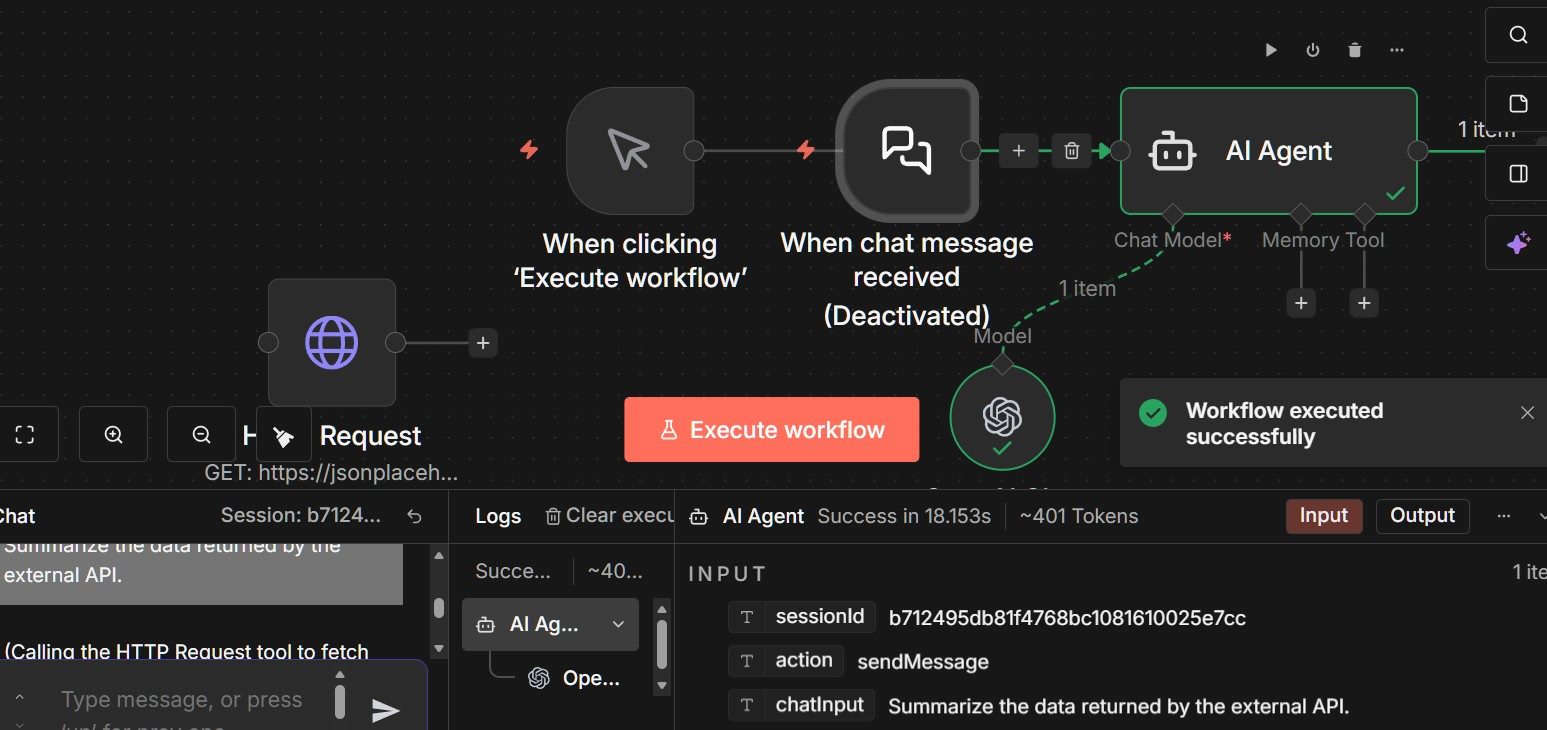
If the agent responds using data from the API and the workflow reports a successful execution, the tool invocation worked as expected. At this point, the agent can reason, decide when external information is required and act by calling an API on demand.
From here, you can move on to more advanced patterns, including dynamic URLs, multiple tools or guardrails that control how often and under what conditions external calls are made.
So far, the AI agent has executed a single instruction and produced a result. That's useful, but it still resembles a structured prompt more than an agent.
What makes an agent different is its ability to evaluate a situation, decide what to do next and repeat that process until it reaches a stopping condition. This behavior is often described as a planning loop.
In n8n, planning loops are not implemented as explicit loop nodes or recursive workflows. Instead, they emerge from a combination of agent reasoning, tool access and controlled iteration limits.
The agent evaluates the user’s request, decides whether it has enough information to respond and, if not, uses an available tool to gather more context before reassessing.
This is where tools become more than simple integrations.
A tool represents a capability the agent may choose to use, not a step that always runs. When an agent has access to multiple tools, it can decide which capability is appropriate based on the current state of the task.
For example, the agent might call an API to retrieve data, evaluate the response and then decide whether it can produce a final answer or needs additional input.
Iteration control plays a critical role here.
In the AI Agent node, the Max Iterations setting determines how many times the agent is allowed to reason, act and reassess before stopping. Each iteration is visible in the workflow’s execution history, making the agent’s decision-making process observable rather than opaque.
This bounded loop prevents runaway behavior while still allowing the agent to adapt its plan as new information becomes available.
A simple example illustrates the pattern: An agent receives a request that depends on external data. On its first pass, it determines that it lacks sufficient information and calls an HTTP Request tool.
On the next iteration, it evaluates the returned data and decides whether it can respond or whether a follow-up action is required. Once the agent determines it has reached a satisfactory result, it produces a final response and stops.
To make this concrete, consider a simple two-step loop.
A user asks the agent to summarize recent data. On its first iteration, the agent determines it does not yet have the required information and calls the HTTP Request tool. On the next iteration, it evaluates the returned JSON, determines that it now has sufficient context, produces a summary and stops.
The loop ends not because it ran out of steps, but because the agent decided it had reached a satisfactory result.
At this stage, the goal is to understand how agent reasoning, tools and iteration limits work together to produce controlled, stepwise behavior. With that foundation in place, you can begin to introduce constraints, approvals and safeguards that make agent workflows suitable for real-world use.
To make the idea of a planning loop concrete, it helps to look at a minimal example running inside a real workflow.
Configure the agent to reason in short, bounded steps, use a single external tool and stop once it has enough information to respond.
The loop begins with how the agent receives input.
Rather than using a fixed prompt, switch on chat-driven input so that the agent can decide when external information is required instead of being forced into a predefined action.

With chat input enabled, give the agent explicit instructions that define both its behavior and its stopping condition.
In this example, it is allowed to reason across multiple steps, call the HTTP Request tool if external data is needed and then produce a final response without continuing indefinitely.
The Max Iterations setting ensures this loop is bounded and observable.

Once you submit a request through the chat panel, the planning loop unfolds predictably.
On the first iteration, the agent evaluates the request and determines that it does not yet have enough information to respond. It then calls the HTTP Request tool to retrieve data from the external API. On the second iteration, the agent evaluates the returned JSON, generates a summary and stops.
This behavior is visible in the execution history, where each iteration and tool call is recorded. Rather than guessing how the agent arrived at its answer, you can inspect each step and see exactly when and why the external API was used.

Again, what matters here is not the complexity of the task, but the structure of the loop. The agent did not run until it hit a limit. It stopped because it determined that the task was complete.
The simple planning loop example shows how an agent can reason, use a tool and stop when it decides a task is complete. That behavior is powerful, but it also introduces risk. Once an agent can loop and act, you need clear boundaries around how far it can go, what it is allowed to touch, and when a human should intervene.
This is where guardrails and human approvals come into play.
In n8n, guardrails are not abstract safety concepts. They are concrete workflow controls that shape agent behavior.
The most basic guardrail is something we have already been using: iteration control. By limiting the number of iterations an agent can perform, you prevent runaway loops and make agent behavior predictable.
As shown in the previous example, a Max Iterations setting of two or three is often enough to support planning behavior while still enforcing a hard stop.
Tool access is another critical guardrail. Agents can only call the tools you explicitly attach to them.
If a node is not exposed as a tool, the agent cannot use it. This makes tool access an allowlist rather than an open-ended capability. In practice, this means you decide in advance which systems an agent is allowed to interact with and which are off-limits.
Human approvals add an additional layer of control when agent actions carry higher stakes.
Instead of allowing an agent to proceed automatically, you can design workflows that pause execution and wait for a human decision before continuing. This is especially useful when an agent is about to trigger a downstream action, write data, notify a customer or take any step that should not be fully automated.
In n8n, approval steps are first-class workflow elements.
When an approval is required, execution pauses in a visible, inspectable state. A human can review the context, including the agent’s reasoning and any data it retrieved, and then decide whether to continue or stop the workflow. That decision becomes part of the execution record, rather than an external, undocumented intervention.
What ties guardrails and approvals together is visibility.
Every pause, decision and stop condition is logged. Instead of trusting that an agent behaved correctly, you can see exactly what it attempted to do and why it was allowed or prevented from continuing.
As agent workflows grow more capable, these controls move from optional to essential. Planning loops make agents flexible. Guardrails and approvals make them trustworthy.
Once an agent can reason, loop and act within defined guardrails, the final requirement is visibility. Without it, even well-constrained agent workflows become difficult to trust, debug or improve over time.
This is where n8n’s execution logs play a central role.
Every workflow that is run in n8n produces a detailed execution record. That record captures the full lifecycle of the agent’s behavior, including the initial input, each reasoning step, any tool calls, intermediate outputs and the final response.
When something goes wrong, or simply behaves differently than expected, there is no need to guess what happened. The evidence is already there.
This becomes especially important once planning loops are involved. As seen in the earlier example, each iteration of the agent’s reasoning is recorded as a distinct step. You can see when the agent decided it needed external data, when it invoked a tool, what data was returned and how that information influenced the final outcome.
This level of transparency turns agent behavior into something you can inspect and explain, rather than something you have to infer after the fact.
Execution logs also make refinement practical. When an agent responds incorrectly or inefficiently, you can review the exact sequence of decisions that led to the result and adjust prompts, tools or guardrails accordingly.
Instead of rewriting workflows blindly, you can make targeted changes based on observed behavior. Over time, this creates a feedback loop where agent performance improves through inspection rather than trial and error.
Monitoring becomes even more valuable as workflows move beyond manual testing.
When agents are triggered by scheduled runs, webhooks or user interactions, execution history provides a running record of how the system behaves in real conditions. Failures, retries, pauses for human approval and successful completions are all visible in one place. This makes it easier to spot patterns, identify edge cases and understand how the agent behaves under different inputs.
Related Article: How to Evaluate and Select the Right AI Foundation Model for Your Business
Building an AI agent is no longer just about prompting a model and hoping for the right response. As soon as agents begin reasoning across steps, calling tools and acting on external systems, the challenge shifts from intelligence to orchestration.
That transition has been shown here in practical terms, starting with a single runnable agent and gradually introducing tools, planning loops, guardrails and visibility.
What n8n provides is structure. Agent behavior becomes explicit, bounded and inspectable rather than opaque or assumed.
Planning loops are constrained rather than open-ended. Tool usage is intentional rather than automatic. Human approvals and execution logs ensure that decisions can be reviewed, understood and refined over time. That combination is what allows AI agents to move from experimentation into systems teams can confidently run and evolve. Not because they are more autonomous, but because they are more understandable.
Scott Clark is a seasoned journalist based in Columbus, Ohio, who has made a name for himself covering the ever-evolving landscape of customer experience, marketing and technology. He has over 20 years of experience covering Information Technology and 27 years as a web developer. His coverage ranges across customer experience, AI, social media marketing, voice of customer, diversity & inclusion and more. Scott is a strong advocate for customer experience and corporate responsibility, bringing together statistics, facts, and insights from leading thought leaders to provide informative and thought-provoking articles. Connect with Scott Clark: 