Feature
Guide
Is AI Making Your Organization More Productive or More Dependent?

While AI agents have become more useful, an important question still looms large: can they securely access the tools, files, databases and business systems needed to do meaningful work?
That is where the Model Context Protocol, or MCP, enters the picture. Designed as an open standard for connecting AI applications to external tools and data sources, MCP is quickly becoming a practical foundation for agentic workflows.
This article examines what an MCP server is, how it works and how developers can build one to give AI systems structured access to real-world context.
The Model Context Protocol is an open standard that enables AI systems to interact with external tools, files and services in a structured and consistent way. Rather than limiting a model to its training data or to whatever exists inside a single application, MCP creates a standard method for connecting AI to the resources it needs to do actual work. Those resources might include local files, APIs, databases, software tools or internal business systems.
The Model Context Protocol replaces one-off integrations with a standardized way for AI systems to access tools and data. Some people refer to MCP as the "USB-C port for AI."
| Approach | Integration Method | Flexibility | Scalability | Maintenance Effort |
|---|---|---|---|---|
| Traditional Integrations | Custom APIs and hard-coded connectors | Low | Limited to predefined connections | High, requires updates per integration |
| Plugin-Based Systems | Predefined tool interfaces | Moderate | Constrained by platform ecosystem | Moderate, requires plugin updates |
| MCP-Based Systems | Standardized protocol with modular servers | High | Easily extensible with new servers | Lower, tools can be added without modifying clients |
More capable AI systems increasingly need access to context that lives outside the model itself. Agentic AI does not simply generate text in response to a prompt. In reality, it may need to retrieve information, call a tool, inspect a file or coordinate actions across multiple systems. MCP addresses that need by providing a consistent way for AI systems to discover available capabilities, request access to them and receive structured results.
At a high level, MCP works through a small set of moving parts. The host is the environment in which the AI runs, such as Claude Desktop, an IDE extension or another agent platform. The client handles communication between that host and any connected MCP servers. The server exposes the capabilities the model can use, whether that means tools, resources or reusable prompts. A transport layer connects them, often through standard input and output in local development, though HTTP and WebSockets can also be used in broader deployments.
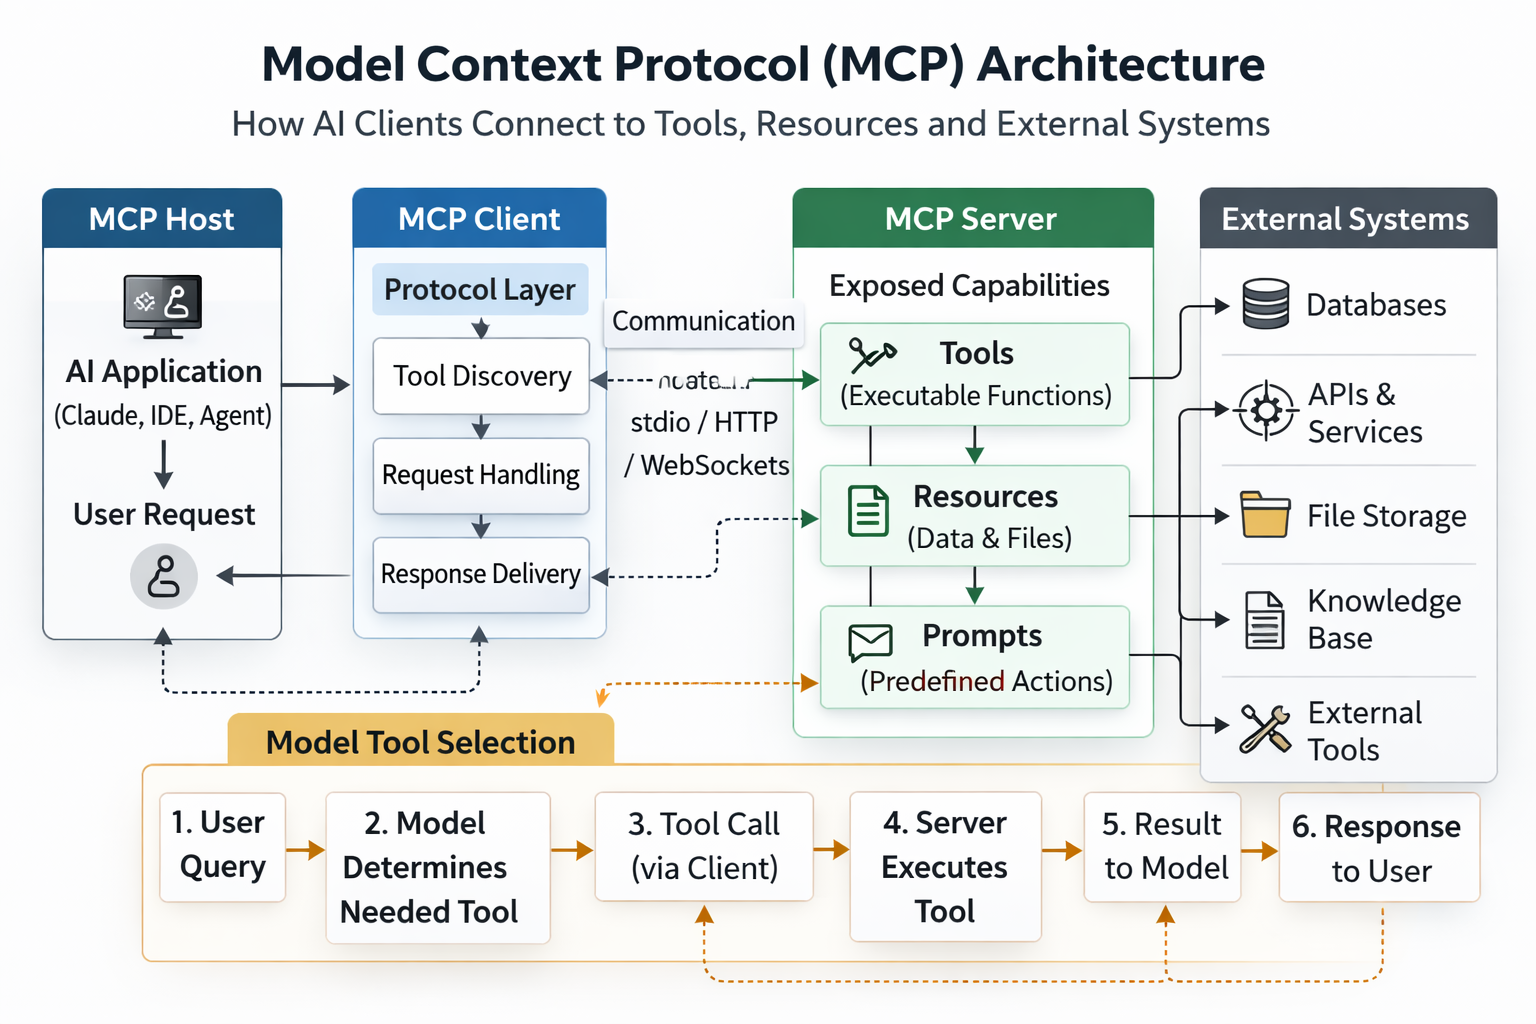
This architecture is what makes MCP more practical than the one-off integrations that have traditionally connected AI systems to external services. Instead of building a custom connector for every data source or tool, developers can expose capabilities through an MCP server and make them available to any compatible client. In effect, MCP gives AI systems a standardized way to participate in a broader software environment rather than operating as isolated models.
That shift is central to why MCP is drawing so much attention. As AI systems become more useful, MCP enables them to securely and predictably interact with systems that contain the information or functionality that is required to complete a task.
Model Context Protocol can't solve every integration challenge. It doesn't automatically secure data, enforce permissions, validate tool outputs or guarantee that connected systems are reliable. Organizations will still need authentication, authorization, governance and monitoring.
MCP also depends on the developers building and maintaining compatible servers, and performance is limited by the speed and availability of the connected tools.
Model context protocol was developed by Anthropic and introduced as an open standard in November of 2024. The tech company designed it to provide a standardized way for AI assistants and applications to connect with external tools, data sources and services.
Although Anthropic created MCP, it's open for any developer or organization to implement.
An MCP server is the component that makes those external capabilities available to the model. While the host runs the AI and the client manages protocol communication, the server exposes the actual functions, data sources or instructions the model can use. In practical terms, it acts as the bridge between the model and the outside systems that contain the information or actions needed to fulfill a request.
An MCP server typically exposes three kinds of elements:
Together, these three elements provide the AI with a clear, structured interface to external context.
When a model encounters a task that requires information beyond its built-in knowledge, it does not directly browse the system at random. Instead, it discovers what the MCP server has exposed, evaluates which tool or resource is relevant and sends a structured request through the client. The client then relays that request to the server, receives the result and passes it back to the model so that the model can continue the workflow. From the model’s perspective, these external capabilities appear as available tools it can invoke when needed.
This is what makes MCP servers so useful in practice. A server might expose a simple local notes tool, which is exactly what this tutorial walks through. It might also provide access to a codebase, a knowledge repository, a CRM record lookup or a workflow that updates information across multiple systems.
The same pattern applies in each case:
The server exposes a defined capability → The client makes it discoverable → The model uses it to solve a task |
|---|
That modular structure is one of MCP’s biggest advantages. Developers can add or remove capabilities by updating the server without redesigning the AI application itself. Once the pattern is in place, the model can work with a growing set of tools and resources through a single standard rather than through brittle, hard-coded integrations.
Before building an MCP server, it's helpful to shift the way you think about what you're creating. You are not building a full application or a complex distributed system. You are defining a small, focused service that exposes a capability an AI model can call when needed.
In practical terms, that means deciding what the model should be able to do. In MCP, that capability is exposed as a tool. It could be something simple, like retrieving a file or searching a set of notes or something more advanced, such as querying a database or calling an external API. The important part is not the complexity of the logic, but how clearly the capability is defined.
Once that capability is identified, the rest of the process follows a consistent pattern. The server exposes the tool with a defined name, input structure and output format. The MCP client makes that tool discoverable to the model. When the model encounters a task that requires it, it calls the tool and uses the result to complete the request. That interaction model is what separates MCP from traditional integrations, where connections are often tightly coupled and hard-coded.
For this tutorial, the goal is to keep the scope intentionally simple. Rather than connecting to an external API or building a multi-step workflow, the server will provide controlled access to a local set of notes. This keeps the focus on how MCP works without introducing unnecessary complexity.
Instead of giving the model unrestricted access to the file system, we define a specific location (in this case, a folder) and expose a small set of tools that interact with it. In the example that follows, those tools allow the model to create, retrieve, list and delete notes. Each action is clearly defined, making it easy for the model to understand when and how to use it.
At a technical level, the setup is straightforward. A language such as Python or Node.js is used to create the server, along with an MCP SDK that handles communication with the client. The server defines its tools, registers them and then runs as a local process, typically communicating through standard input and output.
From there, the server is connected to a client environment such as Claude Cowork. Once connected, the model can discover the available tools and begin using them as part of its workflow. A simple request, such as saving or retrieving a note, becomes a complete end-to-end interaction between the user, the model and the external system exposed by the server.
That is the core pattern we will implement in the next section. The code itself is relatively small, but it establishes the foundation for extending AI systems with real capabilities. Once this pattern is clear, the same approach can be applied to more complex scenarios, including APIs, databases and enterprise systems.
Before building the server, it helps to understand exactly what this example will do. The MCP server in this tutorial provides a simple notes system that Claude can interact with through defined tools.
Instead of giving the model direct access to the file system, the server exposes a small set of controlled operations that allow it to create, retrieve, list and delete notes stored in a local JSON file. Each of these actions is implemented as a tool that the model can call when needed, demonstrating how MCP enables structured, permissioned access to external data rather than unrestricted system access.
The sample MCP server in this tutorial exposes a small set of tools that give Claude structured access to a local notes file.
| Tool | Purpose | What It Does |
|---|---|---|
| add_note | Create a new note | Saves a note title and content to the local JSON file |
| get_note | Retrieve a note | Returns the content of a saved note by title |
| list_notes | View available notes | Lists all saved note titles |
| delete_note | Remove a note | Deletes a note from the local JSON file by title |
Building an MCP server with Cowork starts with a deceptively simple idea: you are creating a local process that exposes tools an AI assistant can call. Unlike traditional APIs, there is no need to configure endpoints or manage network access. The server runs locally and communicates through standard input and output, allowing tools to be executed directly from within Claude or another MCP-compatible client.
Before getting started, a few prerequisites need to be in place. A working installation of Python 3.10 or higher is required, along with a text editor and, in this case, the Claude desktop application. The MCP Python library can be installed via pip by running the following command using Windows PowerShell:
pip install mcp[cli]

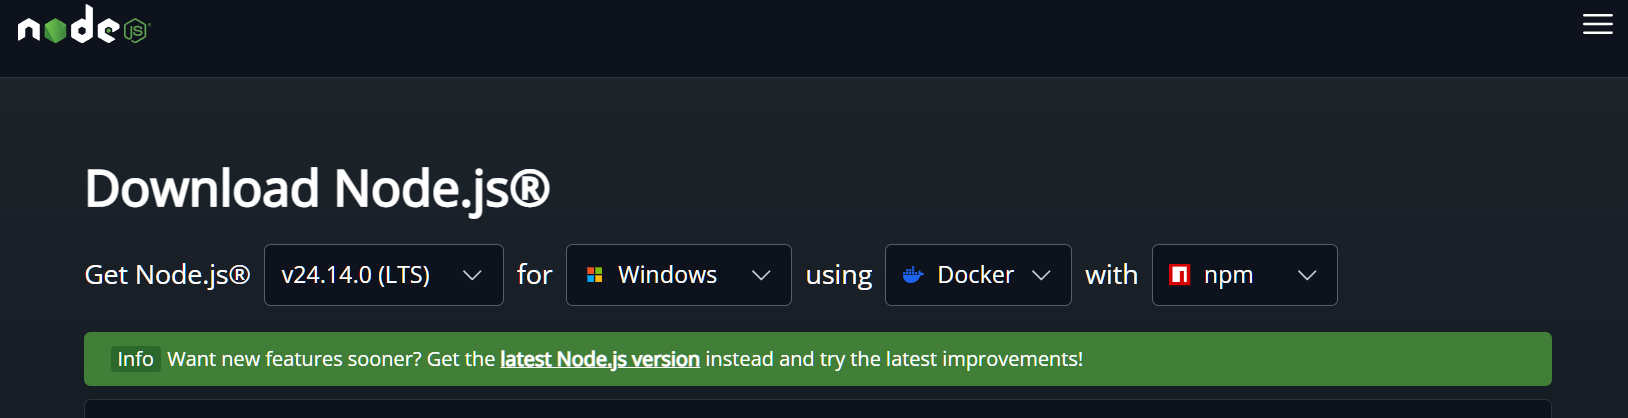
In most cases, installing Node.js is also worthwhile, since it enables access to development utilities such as the MCP Inspector. To install Node.js, go to the Node.js download page. Download the LTS version for your OS, or, if you don’t want to go through the selection process, you can just use the Windows installer or download the binary (Click here to download). Run the installer with all default settings, and you will be all set.
Verifying the Python installation early with a simple check can prevent issues later, particularly in environments where multiple versions are installed.
python --version

With the environment ready, the next step is to create a dedicated project folder. Keeping the MCP server isolated in a clearly named directory makes configuration and debugging significantly easier. From there, the server script itself can be built. The initial version should stay simple. In this case, a notes system provides a practical example, exposing tools for adding, retrieving, listing and deleting notes. Each tool is defined with clear input schemas using Pydantic, enabling Claude to call them correctly.
One issue that consistently comes up during implementation is handling file paths. When Claude launches an MCP server, the working directory is not guaranteed to match the project folder. Using relative paths will often lead to file access errors. A more reliable approach is to build file paths relative to the script itself. Using os.path.join(os.path.dirname(__file__), "notes.json") ensures that the file is always accessed from the same directory as the server script, regardless of where the process is launched from.
NOTES_FILE = os.path.join(os.path.dirname(__file__), "notes.json")
This small change removes confusion and prevents a class of issues where files appear to be missing, duplicated, or written to the wrong location. If there is any uncertainty about where a file is being created or read from, asking Claude to output or log the resolved file path can help confirm that the server is using the expected directory.
Once the server script is complete, it needs to be registered within Claude. This involves editing the configuration file to define the MCP server, pointing to the correct Python executable, and passing the path to the server script. To simplify locating the configuration file, Claude provides direct access through Developer settings. Go to the top, left corner, and click on the “hamburger” menu, and select File, and Settings. Then go to the bottom of Settings, and select Developer. You will be presented with a button that says Edit Config.
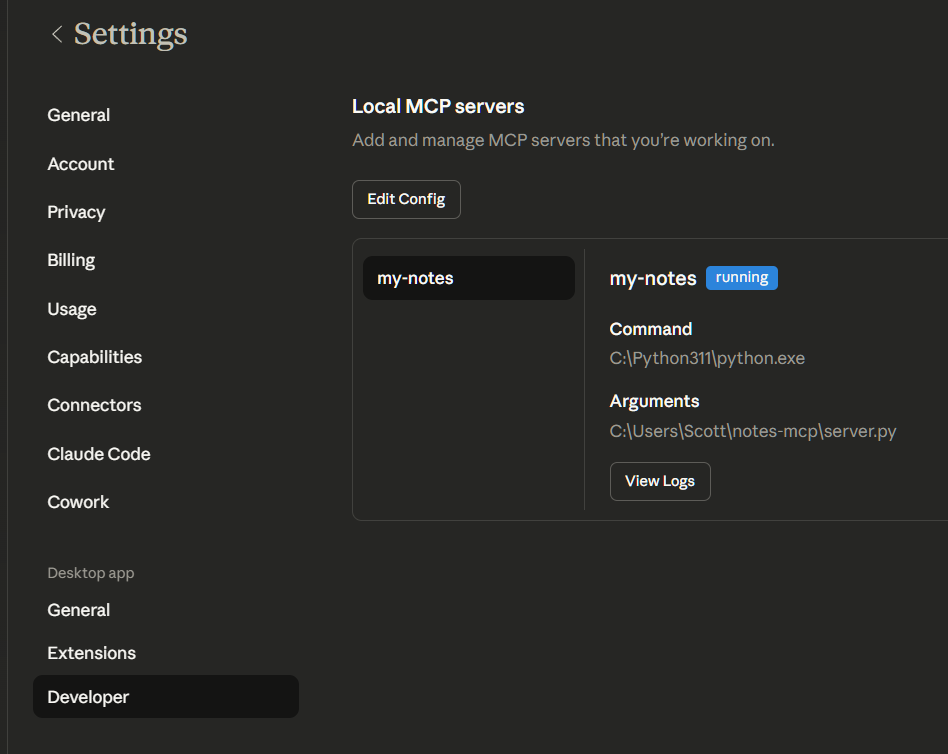
Click it, and you are able to open up the configuration file in a text editor, and then save it with the required settings. The configuration must be structured as a single valid JSON object. If multiple JSON objects exist in the file, they must be merged, or the server will fail to load. In my case, I needed to merge the contents of the existing config file with my own, which ended up looking like this:
json{
"preferences": {
"coworkWebSearchEnabled": true,
"coworkScheduledTasksEnabled": true,
"ccdScheduledTasksEnabled": true,
"sidebarMode": "task"
},
"mcpServers": {
"notes": {
"command": "C:\\Python311\\python.exe",
"args": ["C:\\Users\\Scott\ otes-mcp\\server.py"]
}
}
}
Once you have edited the config file, close down Claude, open up Task Manager (Control, Alt, Delete and select it), and close all of the processes for Claude there, too. Then restart your computer, and finally, restart Claude. If the VM fails to load, it’s the config file that is causing problems.
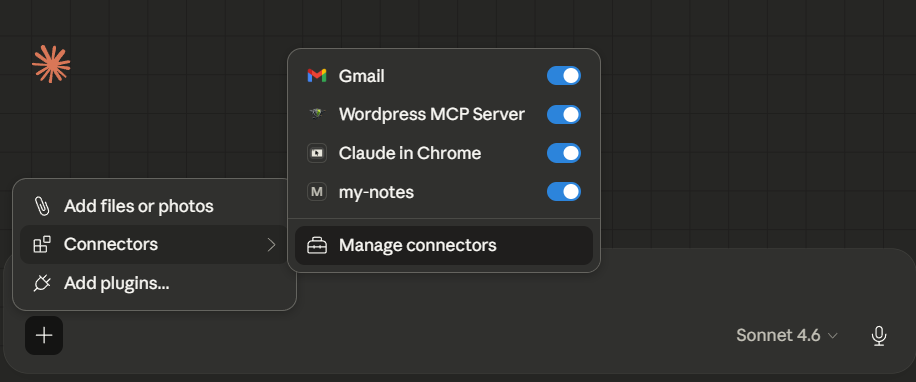
After registration, permissions must be configured for each tool. Claude provides three modes: always allow, require approval, or deny. To access these settings, click the plus button below the Claude chat window, click Connectors, and then select Manage connectors:
Now you need to select your MCP server, which in my case is called my-notes, and you are presented with the permissions area:
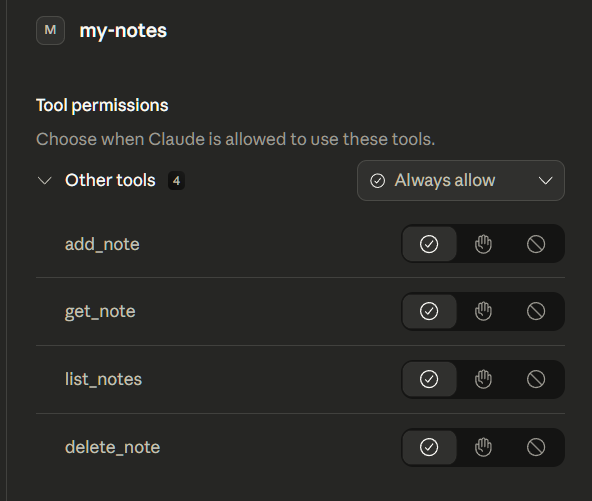
For development and testing, setting tools to “Always allow” creates a smoother experience, enabling rapid iteration without repeated prompts. These permissions can be tightened later as needed.
Testing the server can be done in two ways.
Running the script directly from the terminal starts the server, though it will appear idle as it waits for a client connection. To do so, open your PowerShell or CMD window, and in the same directory as your script, run the following:
python server.py
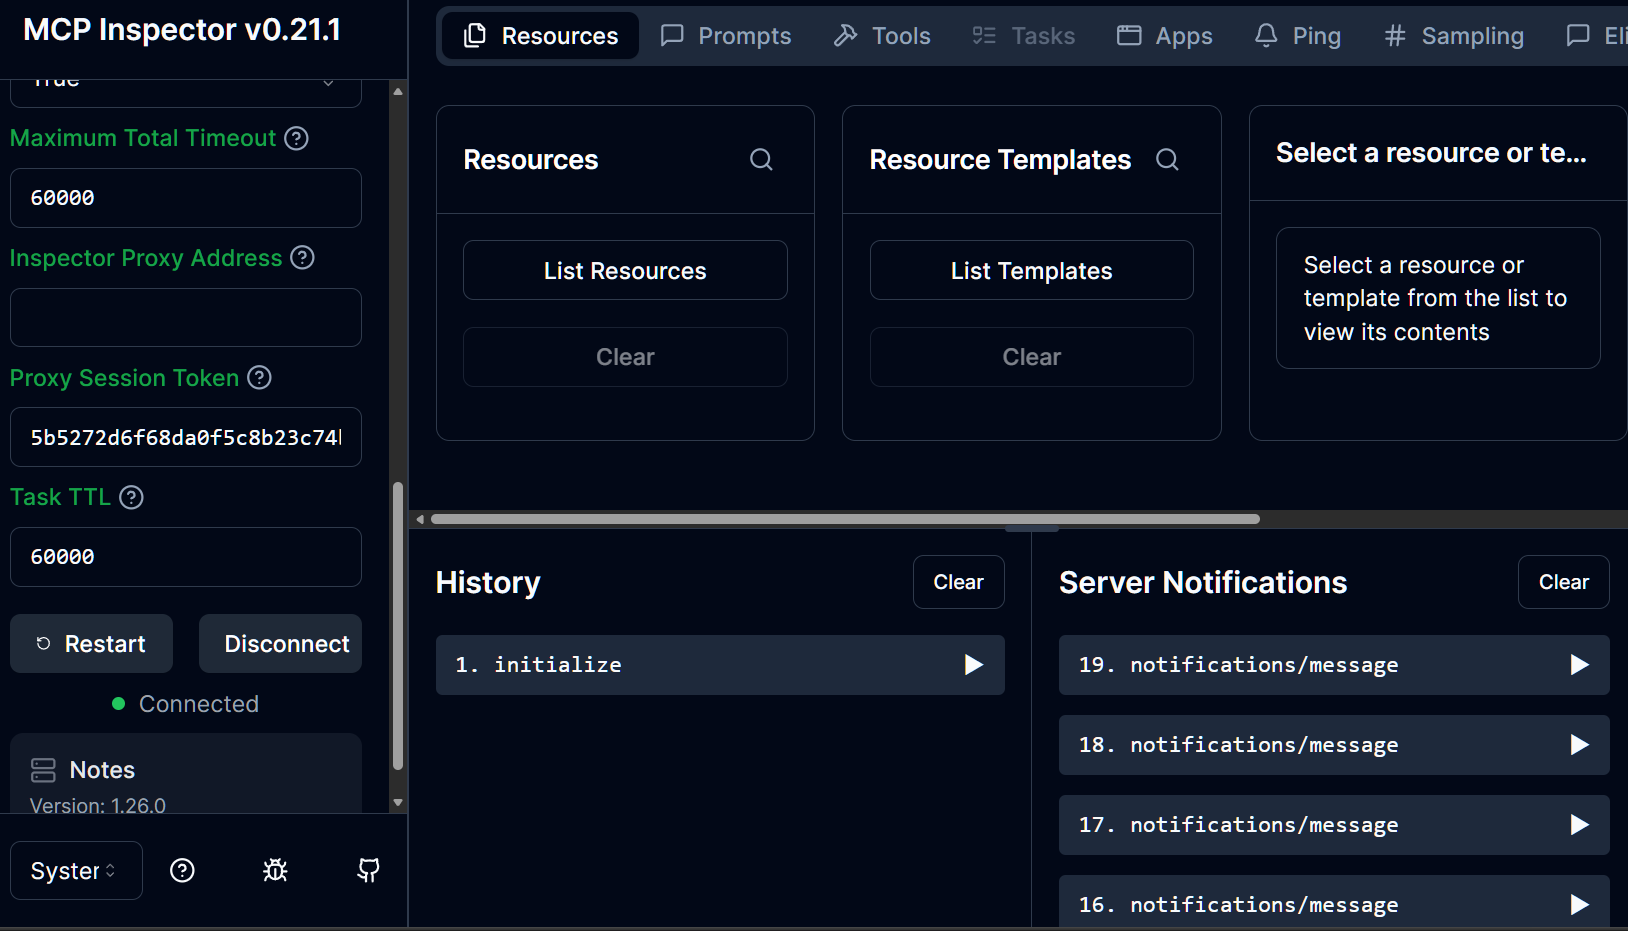
You won't see much output, which is normal. The server is now running and waiting for a client to connect. For a more interactive approach, the MCP Inspector can be launched, providing a browser-based interface to test each tool individually. This step is particularly useful for verifying input handling and ensuring that each function behaves as expected before integrating with Claude.
To open the MCP Inspector, open a second CMD window or PowerShell in the same folder and run:
mcp dev server.pyIf you do not already have the MCP Inspector available, it will be downloaded once you accept the prompt. This opens a local client running in the browser window, where you can experiment with it to see what it is doing:
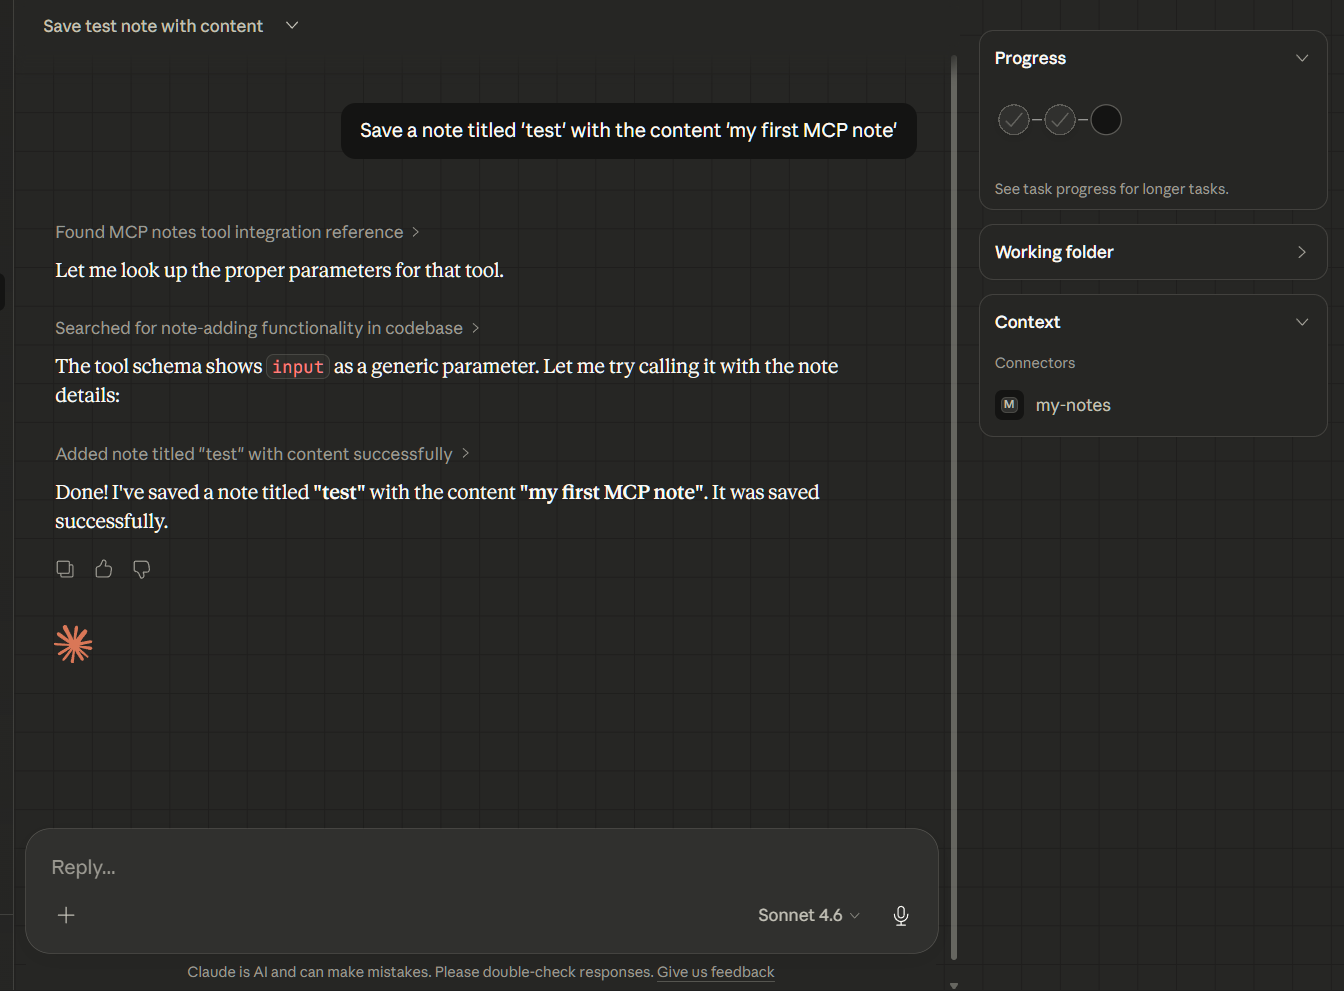
With the server running and registered, the final validation step is to call the tools through Claude itself.
A simple prompt such as “Save a note titled ‘test’ with the content ‘my first MCP note’” can confirm that the full loop is working. If something fails, the MCP logs within Claude become the primary debugging resource, often revealing issues related to permissions, paths or environment configuration.
A few common pitfalls are worth noting. Permission errors often stem from incorrect tool settings or file access restrictions. Running multiple Python versions can lead to confusion if the wrong interpreter is referenced in the configuration. The “server disconnected unexpectedly” message typically indicates a runtime error within the script itself, which can usually be traced through logs or by running the server directly in the terminal.
What emerges from this process is not just a working MCP server, but a clear pattern for extending AI capabilities through local tooling. Once the basic structure is in place, additional tools can be added with minimal effort, turning the server into a flexible layer that connects Claude to real workflows and data.
For readers who want to see the complete Python code, the full server script used in this tutorial is included below. This is the same notes-based MCP server that we built step by step in the previous section, with all tools defined and ready to run.
The initial version of this script was generated by Claude based on a simple prompt to create a notes-based MCP server in Python. From there, the process became iterative. Adjustments were made to file paths, configuration and tool definitions to ensure the server worked reliably within the local environment. Here is what we came up with:
server.py
# -*- coding: utf-8 -*-
from mcp.server.fastmcp import FastMCP
from pydantic import BaseModel
import json
import os
# Initialize the MCP server with a name
mcp = FastMCP("Notes")
# File where notes will be stored
import os
NOTES_FILE = os.path.join(os.path.dirname(__file__), "notes.json")
def load_notes():
"""Load notes from the JSON file."""
if not os.path.exists(NOTES_FILE):
return {}
with open(NOTES_FILE, "r") as f:
return json.load(f)
def save_notes(notes):
"""Save notes to the JSON file."""
with open(NOTES_FILE, "w") as f:
json.dump(notes, f, indent=2)
# --- Tool 1: Add a note ---
class AddNoteInput(BaseModel):
title: str
content: str
@mcp.tool()
def add_note(input: AddNoteInput) -> str:
"""Add a new note with a title and content."""
notes = load_notes()
notes[input.title] = input.content
save_notes(notes)
return f"Note '{input.title}' saved successfully."
# --- Tool 2: Get a note ---
class GetNoteInput(BaseModel):
title: str
@mcp.tool()
def get_note(input: GetNoteInput) -> str:
"""Retrieve a note by its title."""
notes = load_notes()
if input.title not in notes:
return f"No note found with title '{input.title}'."
return notes[input.title]
# --- Tool 3: List all notes ---
@mcp.tool()
def list_notes() -> str:
"""List the titles of all saved notes."""
notes = load_notes()
if not notes:
return "No notes found."
titles = list(notes.keys())
return "Saved notes: " + " ".join(f"- {t}" for t in titles)
# --- Tool 4: Delete a note ---
class DeleteNoteInput(BaseModel):
title: str
@mcp.tool()
def delete_note(input: DeleteNoteInput) -> str:
"""Delete a note by its title."""
notes = load_notes()
if input.title not in notes:
return f"No note found with title '{input.title}'."
del notes[input.title]
save_notes(notes)
return f"Note '{input.title}' deleted."
# --- Run the server ---
if __name__ == "__main__":
mcp.run()
Once a local MCP server is working, it is easy to forget that it is exposing real capabilities to an AI system. In a controlled demo, that might only involve reading and writing a small set of notes, but in a production scenario, those same patterns could extend to APIs, databases or internal systems, which raises a different set of concerns.
The first step is limiting what the server can access. In this tutorial, the server is intentionally scoped to a single folder and a small set of operations. That same principle should carry forward. Instead of exposing broad system access, define narrowly scoped tools that only perform specific actions. This reduces the risk of unintended behavior and makes it easier to reason about what the model is allowed to do.
Permissions also need to be treated as part of the design, not an afterthought. Even though MCP allows a model to discover available tools, that does not mean that every tool should be callable without restriction. In local environments, this often comes down to the permission settings you saw in Claude. In more advanced setups, it may involve authentication, role-based access or additional approval steps before certain actions are executed.
It is also important to plan for failure cases. A model can issue unexpected or malformed requests, especially as workflows become more complex. Servers should handle these cases explicitly, returning clear errors rather than silently failing or executing unintended actions. Logging becomes valuable here, since it provides visibility into how tools are being used and where issues occur.
Finally, consider how the server interacts with external systems. Rate limits can help prevent excessive calls, while sandboxing can restrict what the server is able to reach. These controls are especially important when MCP servers connect to systems that carry cost or contain sensitive data.
The same pattern you used to build a simple notes server can scale to much more powerful integrations. As it does, the boundaries you define around access, permissions and behavior become just as important as the tools themselves.
Building a simple MCP server makes one thing clear: the real value of AI systems lies in their ability to interact with the tools and data that power real work. The MCP notes server in this tutorial is intentionally simple, but the pattern it demonstrates scales directly to APIs, databases and internal systems, where each capability becomes a defined tool that the model can discover and use when needed.
As agentic AI continues to mature, the focus shifts from what a model knows, to what it can access and execute — and MCP provides a practical foundation for that shift by giving developers a consistent way to extend AI systems with real capabilities while maintaining control over how those capabilities are used.